- cuag
- Contents
- 1. Introduction
- 2. Getting prepared
- 3. Initial set up
- 4. Advanced configuration
- 5. The user interface
- 6. Organising your data
- 7. Common workflows
- 8. Contributions
- 9. Pledges
-
10.
Events
- 10.1. What is CiviEvent?
- 10.2. Event planning and management
- 10.3. Creating an event
- 10.4. Online event registration
- 10.5. Integrating events with your website
- 10.6. Manual event registration
- 10.7. Keeping track of events and participants
- 10.8. Complex event fees
- 10.9. Event templates
- 10.10. Reports
- 10.11. Custom data for events
- 10.12. Repeating Events
-
11.
Membership
- 11.1. What is CiviMember
- 11.2. Defining memberships
- 11.3. Online membership sign up
- 11.4. Manual entry of memberships
- 11.5. Membership price sets
- 11.6. Finding and viewing memberships
- 11.7. Membership Reports
- 11.8. Renewals
- 11.9. Cancelling and expiring memberships
- 11.10. Making member only websites
- 12. Email
- 13. SMS (text messaging)
- 14. Reporting
- 15. Case management
- 16. Campaign
- 17. Survey
- 18. Petition
- 19. Civic Engagement
- 20. Grants
- 21. Website integration
- 22. The CiviCRM Community
- 23. Appendices
Everyday tasks
Here we assume that you have already configured an SMS provider in CiviCRM, and are now ready to either test sending an SMS, or engage with your contacts. If you have yet to set up an SMS gateway, please read "Set-up" first.
Sending text messages
SMS messages can be sent to mailing lists or the results of an advanced search for bulk SMS blasting, or a selection of individuals chosen manually.
Messages to a few individuals
If you wish to send a text message to an existing individual, open the contact's profile, click the "Actions" button and select the option "Send SMS". You can also create an SMS in the activities tab of a contact from the "- new activity -" drop-down menu.

A new page will now appear in which to write your message:
- From: choose the SMS provider you would like to send a message from.
- To: this field will automatically populate with the mobile number of the contacts you selected on the previous screen, however, you can add further recipients by typing their name after the first number, and selecting a name from the suggestion list. Note that contacts without mobile numbers will not appear in the list (the phone number type must be "Mobile").
- Name the SMS: this will appear as the SMS activity against the recipient's profiles, so giving it a name appropriate to the subject will help differentiate it from others later (e.g. "Change of email address request").
- Use Template: if an SMS template has been created in the past, you may insert it here to save time (for more information, see "Set-up" in the "Email" chapter).
- Plain-Text Format: here you may enter up to 160 characters of text for the message content. As with emails, tokens can also be inserted to pull information about the contact into the message (e.g. first and last name, or contribution amount; see "Tokens and mail merge").
- Save as New Template: message written, if you wish to re-use the text regularly at a later date, you can save it as a template to save time later.

Finally, once the SMS has been sent, a confirmation message will appear and an SMS activity will be posted against the recipient's contact profile. To view this, open the contact, go to the "Activity" tab and browse the list for an activity of the type "Text Message (SMS)". Click "View" in the last column to see more details, including the message content and campaign.
Mass SMS messaging
Alternatively, you might want to send a personalised SMS to many people at once. Before you start to write your message however, you will need to have a list of recipients. If the message is a one-time affair, you can run an advanced search for the criteria your participants must fall into, select some or all of the contacts in the results list and choose "Send SMS to Contacts" in the "Actions" drop-down menu. Please note that the activity type this method creates will be "Text Message (SMS).

Otherwise should you wish to send bulk text messages to the same group of contacts on a regular basis, you can use a mailing list. If you haven't built one before, or would like to refresh your memory, read the chapter "Setup" in the email section.
To begin writing a bulk SMS, go to: Mailings > New SMS. There will three steps to complete:
Naming your SMS and selecting recipients: first give the text message a name. This will appear as the SMS activity against every recipient's contact profile, so giving it a clear subject will help identify the content later. You will then need to select your recipients, so move the mailing lists you wish to include from the "include groups" box on the left, to the right using the "Add" button. You can also specify groups you do not want to include; contacts who fall into both groups will be not be sent a message (e.g. they may have already received a similar SMS under the group you have chosen not to include). Click Next.

SMS Content: before writing the message, select an available SMS Provider and decide whether to use an existing mailing template for the content of your SMS (see "Setup in the Email chapter).
The message content can either be written manually in the "Compose On-Screen" section, or uploaded from a text file, however, bear in mind that the character limit for both is 160 (this is the length of one text message). You may also insert tokens to personalise the SMS by 'pulling' information about each contact into the message (see "Tokens and mail merge" to learn more). Once written, if you think you would like to reuse the message later, tick the check box "Save as New Template" before going to the next screen.

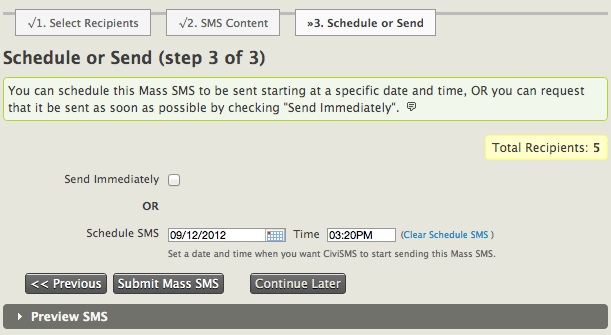
Schedule or Send: you now have the option to send the message immediately, or schedule it to be sent automatically at a future date and time. If you do not wish to do either at the moment, you can click "Continue Later" to save your progress and make the decision later. To return to the message, go to Mailings > Draft and Unschedule Mailings, tick the option "Is SMS" and click "Search". A list of unsent text messages will appear - simply click "continue" against the message you wish to complete.
Finally, you can click on the "Preview SMS" banner at the bottom to check the content, or hit "Submit Mass SMS" to send your message.