- cuag
- Contents
- 1. Introduction
- 2. Getting prepared
- 3. Initial set up
- 4. Advanced configuration
- 5. The user interface
- 6. Organising your data
- 7. Common workflows
- 8. Contributions
- 9. Pledges
-
10.
Events
- 10.1. What is CiviEvent?
- 10.2. Event planning and management
- 10.3. Creating an event
- 10.4. Online event registration
- 10.5. Integrating events with your website
- 10.6. Manual event registration
- 10.7. Keeping track of events and participants
- 10.8. Complex event fees
- 10.9. Event templates
- 10.10. Reports
- 10.11. Custom data for events
- 10.12. Repeating Events
-
11.
Membership
- 11.1. What is CiviMember
- 11.2. Defining memberships
- 11.3. Online membership sign up
- 11.4. Manual entry of memberships
- 11.5. Membership price sets
- 11.6. Finding and viewing memberships
- 11.7. Membership Reports
- 11.8. Renewals
- 11.9. Cancelling and expiring memberships
- 11.10. Making member only websites
- 12. Email
- 13. SMS (text messaging)
- 14. Reporting
- 15. Case management
- 16. Campaign
- 17. Survey
- 18. Petition
- 19. Civic Engagement
- 20. Grants
- 21. Website integration
- 22. The CiviCRM Community
- 23. Appendices
Everyday Tasks
This chapter explains how to perform some common CiviContribute tasks.
Viewing the CiviContribute dashboard
The CiviContribute main page or dashboard summarises the contributions made, including lists of contributions received in the current month to date, year to date, and cumulatively since inception (i.e. all contribution records in your CiviCRM installation). This allows you to easily browse contributions that have been recorded automatically or added manually. The dashboard also provides buttons to manage and add contribution pages.
Different layouts are available for viewing summaries. The following screenshot shows the most recent contribution to a campaign using the Table Layout tab:

You can also view bar or pie charts to compare contribution totals across months of a given year and across years by clicking on the Chart Layout tab.

Finally, you can add any number of contribution report instances to your personal CiviCRM Dashboard. These might include a bar chart summary of year-to-date contributions by Financial Type or month, a list of the top 10 donors, etc. Refer to the Reports section for details on adding reports ("dashlets") to your personal dashboard
Adding contributions manually
When your organisation receives a contribution from a contact, you can add it to their record. This will be done automatically if the payment is made through CiviCRM (for example, a membership or event fee made with an online registration) but offline payments will need to be manually recorded to ensure that reports generated from CiviCRM are accurate.
If the donor does not already exist in the database, you need to first create a new contact record for them;see the chapter on Contacts in the Basic Concepts section of this book for information on how to do this. Once the record is created, you can then enter the contribution.
To manually enter a contribution for a contact in your database:
- Find the contact's record using one of the contact search tools, for example Search > Find Contacts.
- Select the contact's Contributions tab.
- Click Record Contribution (Check, Cash, EFT...). Alternatively, if you have set up a payment processor that allows credit card transactions directly on your site, you may select the Submit Credit Card Contribution option and process the payment immediately.
Complete the new contribution form. The following screenshot shows the offline contribution (i.e. contributions via check, cash, EFT, etc.) form. If you selected to record a credit card contribution, the credit card form is almost identical except for the payment-related fields.

Record the Financial Type, amount, received date (the default is the current day), receipt date (shown on the receipt generated by the system), and status (the default is Completed). Any custom fields for contributions will also appear on this form.
- The Soft Credit To field works with personal campaign pages (PCPs) that harness your contacts' help for campaigns. When you enter a donation manually on the contribution form for the contributor, you can assign a soft credit to the owner of the PCP. There is more information about PCPs and campaign fundraising pages in the Set-up chapter of the CiviContribute section.
- The Additional Details section near the bottom of the screen offers other options including adding a note about the contribution and entering the date when a thank-you letter was sent.
- The last two sections allow you to enter whether the contribution was in honor of someone else (Honoree Information) and whether there is a premium associated with the contribution (Premium Information).
- Click Save, or Save and New if you are entering further contributions.
If you find that you are entering more than a few contributions at the same time, consider using the Bulk Data Entry method described later in this chapter.
Finding contributions
To View the Find Contributions screen, go to Contributions > Find Contributions

You can search based on a number of criteria, such as date range, amount, contribution status etc. Contributions must match all specified criteria in order to be returned, so the more criteria you enter, the narrower the search will be. For example, searching for the Financial Type "donation" and the date range "January 1st to May 31st" will return contributions that meet both criteria. Relative date ranges such as "Last Month" or "Last Year" are often quite useful.
The search criteria shown above are also available from Advanced Search, which means you can get results as a list of contacts OR contributions. Advanced Search allows you to save a query as a smart group - and you can also filter your results with additional contact criteria including donor addresses and demographics ("Show me all contacts who have contributed more than $100 last year AND who live in California").
The results screen from a search displays the the total amount for the results returned for that search, the number of contributions, and the average amount per contribution in addition to the subset of records resulting from the search:

You can select an action to perform from the - actions - menu once you select all or a subset of records. The "actions" menu allows you to:
Batch Update Contributions Via Profile: this is useful if you want to update a large number of contributions' thank-you date at once, for example. You need to create the profile you want to usebefore you perform the search and batch update (see the the chapter Profiles in the Configuration section for more information about creating profiles).
Delete Contributions: this removes contributions entirely from the system, as if they had never been entered in the first place. Editing contribtions and updating their status to canceled provides a better audit trail, but there may be situations where you do want to delete, such as a contribution entered on the wrong contact's record.
Export Contributions: because this search is contribution-centric, it does not recognise if contributions come from the same contact. Therefore, if one contact has multiple contributions that fit the search criteria, that contact will appear as multiple rows when you export your spreadsheet. If you want to do searches that return one result per contact, use the contact advanced search.
Print or Email Contribution Receipts: this allows you to create a PDF file of all the receipts in the search, or email the receipts to the associated donors. See "Sending thank you letters" below for more information.
Send Email to Contacts: send an email to all or selected contacts found in the search.
Send Thank-you Letters for Contributions: create a custom PDF letter for each of the contributions selected, with the option to update the receipt or thank you date for each.
Update Pending Contribution Status: update the contribution status of all or selected contacts who have contributed online. This action only works with online contributions, and the same contribution status will be applied to all the contributions selected for updating.
Batch Entry of Contribution, Membership or Pledge Payments
The Batch Data Entry feature allows you to enter contribution, membership or pledge payments using a batch entry grid input screen where you can use the ‘autocopy’ icons at the top of each column to quickly fill in field values. It eases data entry when you have a lot of payments to record at one time. It also lets you verify the total amount and count of items in the batch against the payments recorded on your deposit slip(s).
Each batch contains either contribution payments, membership payments or pledge payments. During the batch data entry you can create new contacts on the fly. You can save the batch and return later to continue entering payments. If you have the appropriate permissions, you can also edit the total amount and count of items in the definition of the batch if needed.
Here’s a simple workflow for bulk data entry:
1. Create a new batch for data entry
Create a new batch to hold the multiple payments you want to record:
From the menu, click on Contributions > Batch Data Entryor Membership > Batch Data Entry**.**

Enter the following information:
- Batch Name: CiviCRM will create a default batch name ("Batch N" + open date), which you can edit (required field)
- Type: select the type of payment, e.g. Contribution, Membership or Pledge Payment. This selects the appropriate reserved profile to view in the batch entry grid screen (Contribution Batch Entry profile, Membership Batch Entry profile or Pledge Payment Batch Entry profile)
- Status: the default will be “Open” (note: once a batch has a “closed status”, the batch will no longer be editable)
- Number of items: total of payment items in the batch (required field)
- Total amount: total amount of all the payment items in the batch (required field)
You can later edit or delete Batch information, by going back to the Bulk Data Entryscreen, then clicking on Edit or Delete next the batch you want.
2. Enter Contribution, Membership or Pledge Payments (check, cash, EFT, etc.)
Once you enter information about the batch, you can begin entering
payments on each
line.
There are eight fields that appear for all batches.
The Contact column is included for all batch types. In that column you can:
- start entering the name of an existing contact and CiviCRM will return a list of potential contact names for you to select, OR
- create a new contact by clicking the drop-down box for “-create new contact-“ and selecting the type of contact you want to create: New Individual, New Organization, or New Household and enter the information about the contact here. Note: If contact information such as phone number or email address are included in the grid profile, those values will be populated for an existing contact and can be updated as needed.
- Type:This is the Financial Type and is called that in membership batches to distinguish it from Membership Type.
- Amount
- (Payment) Status
- Received – Date and Time
- Send Receipt: check the box if you want to send a receipt via email
- Soft Credit
- Soft Credit Type
When batch entering contribution payments the additional fields in the standard profile are:
- Source : enter text that describes the source of the payment
- Paid by: enter the type of payment vehicle, e.g. cash, check, EFT, etc.
- Check Number: if paid by check
- Invoice ID
When batch entering membership payments you can choose to add a new membership or renew an existing membership. The extra fields in the standard profile are:
- Type: For a new membership you will select the organisation and type of membership. For the renewal you can change the membership type.
- Member Since:When you open the batch entry form, this is populated with the current date If you choose to renew a membership it will change to display the start date for that membership. It can be edited as needed.
- Start Date(reserved): This is blank. You only need to fill in this field if you want the start date to be other than the default.
- End Date(reserved): If this is left empty, CiviCRM will use the membership rules to set it to the correct date.
- Source: Enter text that describes the source of the payment.
- Paid by: Enter the type of payment vehicle, e.g. cash, check, EFT, etc.
- Check Number: Enter if paid by check.
- Invoice ID
When batch entering pledge payments you can assign the payment to any of the pending pledges for that contact. If you have the appropriate permissions, you can also alter the amount or schedule for the pledge payment. (Click on adjust payment amountnext to the Amount field.)The extra fields in the standard profile are:
- Source: enter text that describes the source of the payment
- Paid by: enter the type of payment vehicle, e.g. cash, check, EFT, etc.
- Check Number: if paid by check
- Invoice ID
3. Validate and Process the Batch Totals or Save the Batch
You can enter all transactions for the batch in one session, or simply save the batch and complete the data entry at a later time.
If you want to continue entering information into this batch at a later time, click Save & Continue Later.
To find and add/edit more transactions into the batch later:
- From the menu, click on Contributions > Batch Data Entry or click on Membership > Batch Data Entry, then click onEnter Records next to the batch you want
Then continue entering more transactions in the batch
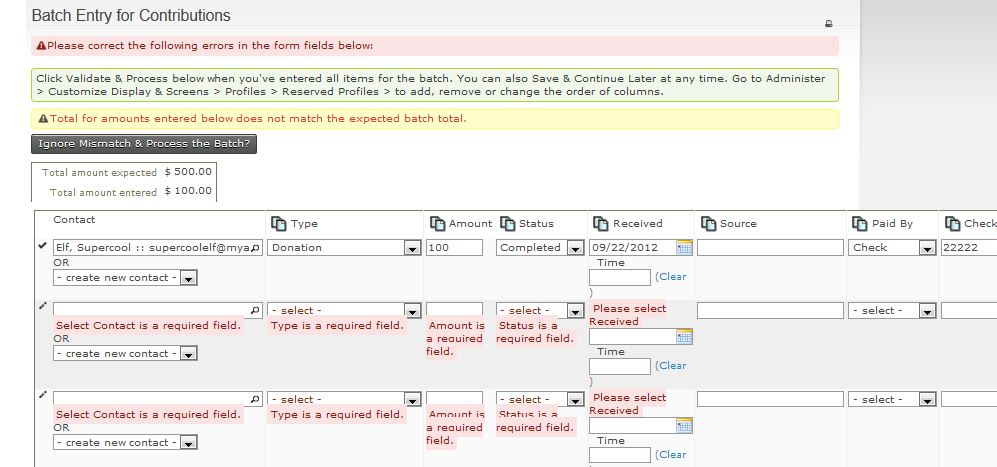
Once you are finished entering payments into a batch, clickValidate & Process the Batch. The status of the batch will be set to “Closed” and will available for searches and reporting later.
If the total amount or count of items do not match the values you entered when you created the Batch, you will be alerted when closing if the count or total don't match. In this case, you either:
- You can override the entered count and total by clickingIgnore Mismatch & Process the Batch? button, in which case the batch values are updated to match the transactions in the batch, and then the status of the batch will be set to “Closed”, OR
- You can continue entering or editing the payments for the batch, then Validate & Process the Batch again.
4. Search for contribution, membership or pledge payments in verified and processed batches
You can search for contribution or membership payments in verified and processed batches in a several ways:
- From the menu, click on Searches > Find Contributions , enter criteria for the contributions, and under Batch Name, select the batch you want;
- From the menu, click on Searches > Advanced Search, enter criteria about the contact, then open the Contributions area and enter any contribution criteria, and under Batch Name, select the batch you want;
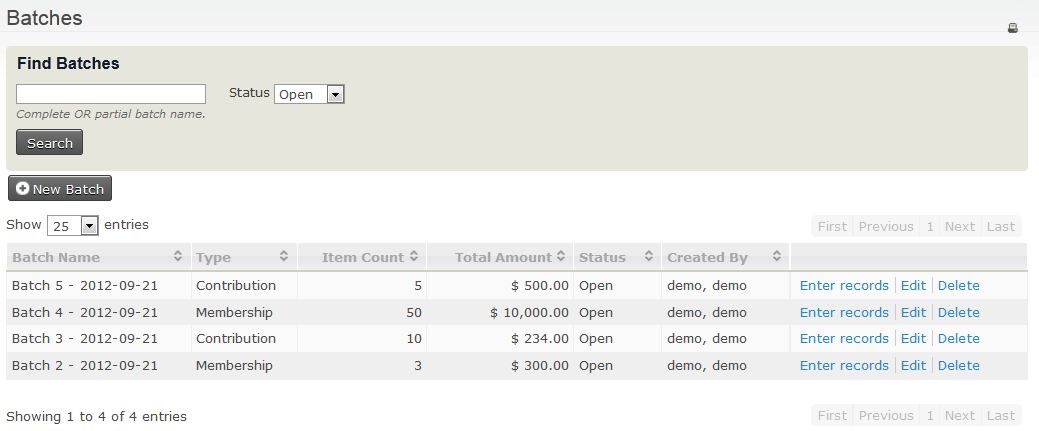
- From the menu, click on Contributions > Batches , then select Closed in the Statusfield;
- From the menu, click on Memberships > Batches , then select Closed in the Status field;
- From the menu, click on Pledge Payments > Batches, then select Closed in the Status field;
- From the menu, click Reports > Create Reports from Templates, then click Contribution Report Detail, enter your report criteria and under Set Filters area, next toBatch Name, select “is one of” or “is not one of” and select the name(s) of the batch(es) you want.
Sending receipts and thank you letters
Receipts
Donors making contributions through an online form will automatically receive an email receipt for their payment, provided the option to send them was selected during the configuration of the contribution page. If you wish to manually send or re-send a receipt at a later date, you can do so by either editing the contribution record against a contact and ticking the option Send Receipt? (an email will be sent after you click Save).
You can send receipts to multiple contacts at the same time through the
contributions search. Simply run a search, as above, and after selecting
the contacts you wish to send a receipt to, choose Print or Email
Contribution Receipts from the actions drop-down menu.

You will be given the option to email the receipts or make PDF receipts to post out to contributors.

By default the emailing or creating PDF receipts will update the receipt date for each contribution, but you can keep the existing receipt dates if you need to. You can also choose to disregard the Do not email/Do not mail settings so that all selected contributors are sent a receipt
To find out how you can change the format of receipts, see the chapter Contributions > Set-Up.
Thank-you letters
Some organisations may wish to send thank-you letters to people who donated to a particular campaign, advising them of the total amount raised. Other organisations like to send one receipt to each contact at the end of the fiscal year covering all tax-deductible donations made during that year. Both of these scenarios and more can be accomplished using the "Thank-you letters for Contributions" functionality. This action is available from a search results screen displaying contributions (rather than contacts). The steps involved are:
- Use Find Contributions or use Advanced Search with Display Results As set to Contributions for your search.
- Select the contributions for which you want thank-you letters or combined receipts.
- Choose the action Thank-you Letters for Contributions. The
following will be displayed:

- Choose to Update thank-you dates for these contributions or Update receipt dates for these contributions as required. The current date will be entered into the appropriate field.
There are three self-explanatory Print and Email Options:
- Generate PDFs for printing (only)
- Send emails where possible, generate printable PDFs for contacts who cannot receive emails
- Send emails where possible, generate printable PDFs for all contacts.
Some people may have made more than one contribution. If you want to send one letter for each contribution then set Group contributions by to "-no grouping-". Alternatively, you can choose to show contribution data for multiple contributions from the same contact in one location in the body of your letter. There are five "group by" " options.
- Separator (grouped contributions) only applies if you have chosen something other than - no grouping - for the contributions. These options will be discussed below in Formatting for grouped contribution thank-you letters.
- Make sure to check the Page Format settings.
- You can use an existing template, create a new letter for one-off use, or create a new letter and save it as a new template. See Tokens and mail merge and Postal mail communications in the Common Workflows section for more information on creating letter templates.
- When you click on Make Thank-you Letters the letters will be generated and a "Print PDF letter" activity will be created for each letter with the Activity Subject you have specified.
Grouped contribution thank-you letters
You can send end-of-fiscal-year giving statements/tax receipts to your contacts if you choose an option other than -no grouping- for the field Group contributions by.
In a standard CiviCRM installation, the letters that can be produced when you group contributions are fairly rudimentary.
If you choose Comma as the Separator then the contribution amounts and/or dates will follow one after the other separated by commas. For example "Thank you for your generous donations of {contribution.total_amount} received on {contribution.receive_date} respectively." will become "Thank you for your generous donations of $100.00, $150.00, $325.00 received on 1 January 2015, 5 March 2015, 16 May 2015 respectively."
If you choose Table Cell as the Separator then each contribution instance will be placed in its own table column. For example:

will result in:

This format works well if only a few contributions have been received during the year, but the table will be wider than the page for monthly, fortnightly or weekly donations.
In neither case can the total yearly contribution amount be included in the letter.
To include the total yearly contribution amount in the letter and to produce a letter more suited to several contributions from the one person, you (or your implementer/developer) will need to enable Smarty functionality for you emails (http://wiki.civicrm.org/confluence/display/CRMDOC/Smarty+in+mail+templates).
Once that has been done the total yearly contribution amount can be included in the letter using the token {$contribution_aggregate}.
For example, if the HTML source for your letter is:
<p>Dear {contact.first_name}</p>
<p>Thank you for donating ${$contribution_aggregate} to help the arts during the 2014 financial year</p>
<p>Your donation is tax deductible and the details are given below.</p>
<p>with appreciation for your generosity,</p>
<p>the CEO</p>
  <table class="table" style="width: 500px;" border="1" cellspacing="0" cellpadding="2" align="left">
    <tbody>
      <tr>
        <th>Date</th>
        <th>Amount</th>
        <th>Receipt Number</th></tr>
    <!--
    {foreach from=$contributions item=contribution} {assign
    var="date" value=$contribution.receive_date|date_format:"%d %B
    %Y"}
  -->
      <tr>
        <td>{$date}</td>
        <td>{$contribution.total_amount}</td>
        <td>{$contribution.id}</td>
      </tr>
   <!--
    {/foreach}

 --></tbody>
  </table>
then your letters will look like:
