- cuag
- Contents
- 1. Introduction
- 2. Getting prepared
- 3. Initial set up
- 4. Advanced configuration
- 5. The user interface
- 6. Organising your data
- 7. Common workflows
- 8. Contributions
- 9. Pledges
-
10.
Events
- 10.1. What is CiviEvent?
- 10.2. Event planning and management
- 10.3. Creating an event
- 10.4. Online event registration
- 10.5. Integrating events with your website
- 10.6. Manual event registration
- 10.7. Keeping track of events and participants
- 10.8. Complex event fees
- 10.9. Event templates
- 10.10. Reports
- 10.11. Custom data for events
- 10.12. Repeating Events
-
11.
Membership
- 11.1. What is CiviMember
- 11.2. Defining memberships
- 11.3. Online membership sign up
- 11.4. Manual entry of memberships
- 11.5. Membership price sets
- 11.6. Finding and viewing memberships
- 11.7. Membership Reports
- 11.8. Renewals
- 11.9. Cancelling and expiring memberships
- 11.10. Making member only websites
- 12. Email
- 13. SMS (text messaging)
- 14. Reporting
- 15. Case management
- 16. Campaign
- 17. Survey
- 18. Petition
- 19. Civic Engagement
- 20. Grants
- 21. Website integration
- 22. The CiviCRM Community
- 23. Appendices
Everyday tasks
Recording payments
If a donor has chosen to use an offline payment method such as cash or cheque, you will need to manually record the receipt of payment within the pledge. To do this:
- Look up the contact in CiviCRM
- Go to the 'Pledges' tab within their contact record
- Click the small arrow on the far left of the pledge to open up the scheduled pledge payments
- Find the next scheduled pledge payment and record the payment as paid.
- You can also edit the scheduled payment to alter either when the payment is due or the amount of the payment.

Batch entry of pledges
The Batch Data Entry feature speeds up data entry when you have a lot of pledge payments to record at one time. You enter payments using a grid input screen where you can use the ‘autocopy’ icons at the top of each column to quickly fill in field values. It also lets you verify the total amount and count of items in the batch against the payments recorded on your deposit slip(s).
During the batch data entry you can create new contacts on the fly. You can save the batch and return later to continue entering payments. If you have the appropriate permissions, you can also edit the total amount and count of items in the definition of the batch if needed.
1. Create a new batch for data entry
Create a new batch to hold the multiple payments you want to record:
From the menu, click on Contributions > Batch Data Entry then select New Data Entry Batch.

Enter the following information:
- Batch Name: CiviCRM will create a default batch name ("Batch N" + open date), which you can edit (required field)
- Type: Select Pledge Payment. This selects the appropriate reserved profile to view in the batch entry grid screen.
- Status: the default will be “Open” (note: once a batch has a “closed status”, the batch will no longer be editable)
- Number of items: total of payment items in the batch (required field)
- Total amount: total amount of all the payment items in the batch (required field)
You can edit or delete Batch information by going back to the Bulk Data Entry screen then clicking on Edit or Delete next to the batch you want.

2. Enter Pledge Payments (check, cash, EFT, etc.)

When you save information about the new batch, the batch data entry screen shown above will appear and you can begin entering payments on each line as follows;
Contact. You can:
- start entering the name of an existing contact and CiviCRM will return a list of potential contact names for you to select, OR
- create a new contact by clicking the drop-down box for “-create new contact-“ and selecting the type of contact you want to create:New Individual, New Organization, or New Household and enter the information about the contact here.
Note: If contact information such as phone number or email address are included in the grid profile, those values will be populated for an existing contact and can be updated as needed.
Open Pledges: Click on the down arrow to see all open pledges for the contact. You can assign the payment to any of the open(pending) pledges.
Type:This is the Financial Type and pre-fills when an open pledge is selected.
- Amount: This will pre-fill when you select an open pledge. If you have the appropriate permissions, you can also alter the amount or schedule for the pledge payment. (Click on adjust payment amount next to the Amount field.)
- (Payment) Status.This defaults toCompleted.
- Received – Date and Time This pre-fills with the current date but can be edited.
- Source: Enter text that describes the source of the payment.
- Paid by: Enter the payment instrument, e.g. cash, check, EFT, etc. This is a required field.
- Check Number: fill in if paid by check
- Send Receipt: check the box if you want to send a receipt via email
- Invoice ID
- Soft Credit
- Soft Credit Type
3. Validate and Process the Batch Totals or Save the Batch
You can enter all transactions for the batch in one session, or simply save the batch and complete the data entry at a later time.
If you want to continue entering information into this batch at a later time, click Save & Continue Later.
To find and add/edit more transactions into the batch later:
- From the menu, click on Contributions > Batch Data Entry then click on Enter Records next to the batch you want.
Then continue entering more transactions in the batch.
Once you are finished entering payments into a batch, click Validate & Process the Batch. The status of the batch will be set to “Closed” and will available for searches and reporting later.
If the total amount or count of items do not match the values you entered when you created the Batch, you will be alerted when closing if the count or total don't match. In this case, you either:
- You can override the entered count and total by clickingIgnore Mismatch & Process the Batch? button, in which case the batch values are updated to match the transactions in the batch, and then the status of the batch will be set to “Closed”, OR
- You can continue entering or editing the payments for the batch, then Validate & Process the Batch again.

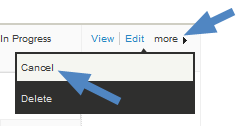
Canceling pledges
Sadly, some pledges will not come to fruition. To cancel a pledge, find it through a contact or the 'find pledges' search tool, use the 'more' link to the right side of the pledge and click 'Cancel'.