- cuag
- Contents
- 1. Introduction
- 2. Getting prepared
- 3. Initial set up
- 4. Advanced configuration
- 5. The user interface
- 6. Organising your data
- 7. Common workflows
- 8. Contributions
- 9. Pledges
-
10.
Events
- 10.1. What is CiviEvent?
- 10.2. Event planning and management
- 10.3. Creating an event
- 10.4. Online event registration
- 10.5. Integrating events with your website
- 10.6. Manual event registration
- 10.7. Keeping track of events and participants
- 10.8. Complex event fees
- 10.9. Event templates
- 10.10. Reports
- 10.11. Custom data for events
- 10.12. Repeating Events
-
11.
Membership
- 11.1. What is CiviMember
- 11.2. Defining memberships
- 11.3. Online membership sign up
- 11.4. Manual entry of memberships
- 11.5. Membership price sets
- 11.6. Finding and viewing memberships
- 11.7. Membership Reports
- 11.8. Renewals
- 11.9. Cancelling and expiring memberships
- 11.10. Making member only websites
- 12. Email
- 13. SMS (text messaging)
- 14. Reporting
- 15. Case management
- 16. Campaign
- 17. Survey
- 18. Petition
- 19. Civic Engagement
- 20. Grants
- 21. Website integration
- 22. The CiviCRM Community
- 23. Appendices
Installation and basic set-up
Before reading further, please be aware that much of the information contained here is intended for technicians and may be difficult to understand if you have little or no experience in setting up web applications. If you don't understand this topic, you may wish to either seek help, or point your organisation's technical staff to this material.
Prerequisites
Before exploring the installation of CiviCRM, ensure you have read the chapter 'hosting' to confirm whether or not your host can support it.
CiviCRM must be installed on a computer that has been configured with a web server (such as Apache or ngnx), PHP and MySQL. Some people prefer to try out CiviCRM on their own local computer before installing it on a dedicated web-server. If you are doing this and don't have the prerequisites just mentioned, you can download packages from the Internet such as WAMP, XAMPP, MAMPP and LAMP, which will quickly install an Apache web server, PHP and MySQL. (The first two packages are for Windows and the second two are for the Macintosh and Linux respectively).
Before you can begin installation, you need to decide which CMS (Content Management System; used for building and managing websites) you wish to integrate with, choosing between the open-source options: Drupal, Wordpress or Joomla!.
You can find full instructions on installing CiviCRM here: http://wiki.civicrm.org/confluence/display/CRMDOC/Installation+and+Upgrades
Internet vs. local installs
Most organisations access CiviCRM over the internet. However, some organizations who only want internal staff to have access to CiviCRM and are security conscious, choose to install CiviCRM on an internal network and have it only accessible internally. The downside to an install that is not publicly available is that your contacts cannot 'self serve' to update their data.
Upgrades
New versions of CiviCRM are released approximately twice a year (once in the Spring and once in the Autumn). You will need to apply upgrades to your CiviCRM site periodically if you want to take advantage of new features and improvements, and also to keep your site secure. Some upgrades contain security fixes and it is crucial that these are applied in a timely manner. It's important that you plan for the resources (people and time) required to apply upgrades to your site. You need to plan on testing upgrades on a copy of your live site to make sure the process runs smoothly. It's also critical to make backups of your site and database prior to running an upgrade on your live site even if you had tested the process on a test site.
Since upgrades are an important and technical process, many organisations employ the services of a CiviCRM expert service provider to carry them out.
Configuration
Once CiviCRM has been installed, you should review the initial configuration tasks which allow you to customize CiviCRM for your organization.
Log in to your CiviCRM site and navigate to Administer > Administration Console > Configuration Checklist. This section will cover the general tasks, while component-specific configuration will be covered in each component section.
Use this checklist to review and complete configuration tasks for your site. You will be redirected back to this checklist after saving each setting. Settings which you have not yet reviewed will be displayed in red. After you have visited a page, the links will display in green (although you may still need to revisit the page to complete or update the settings).
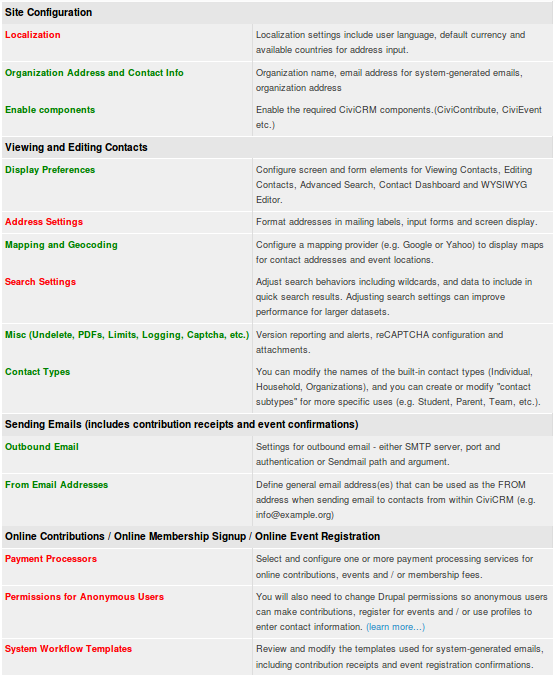
Localization
Localization involves adapting CiviCRM for use in a specific country or language by translating the text displayed on the screen and setting region specific formats for dates and money (including currency). By default, CiviCRM is localized for the United States. If you are using CiviCRM in a different country, need to store contact addresses that appear in countries other than the United States, or want to use CiviCRM in another language, you will need to review and update the values on this screen.
CiviCRM has been translated into a number of different languages and translations are available to download when you download CiviCRM. These translations are contributed by community members. If CiviCRM is not available in your language, you may wish to consider translating it. You can find a translation guide on the wiki.
It is also possible to configure your site to support multiple languages. In this mode, your users will be able to choose from a list of available languages after logging in. You can also create and store multi-language versions of text. Examples include custom field labels, an online contribution page, campaign information, and event descriptions.
For more info, have a look here: http://wiki.civicrm.org/confluence/pages/viewpage.action?pageId=88408149
Organization Address and Contact Info
Use this screen to enter identifying information for the organization or entity which "owns" this CiviCRM installation. The organization name and address are used to identify your organization in CiviMail mailings when you include the domain.name and domain.address tokens.
You should also enter a valid email address belonging to your organization, which will be used as the From field in system-generated (automated) emails.
Enable components
This is where you can turn on or turn off the components for your CiviCRM system.
When you first install CiviCRM the most frequently used components (CiviContribute, CiviEvent, CiviMail, CiviMember, CiviReport) are already enabled. If you do not need those components you can disable them. You can also enable any or all of CiviCampaign, CiviCase, CiviGrant and CiviPledge. You can revisit this page at any time to enable more components.
You can also disable a component you have already used. The information in the component is retained and will still be there if you re-enable it. It would be unusual to disable a component you have already used. If you want to simplify the administration menu and advanced search page then a better approach may be to use permissions (see the Permissions and access control chapter).
Display Preferences
This screen allows you to modify the screen and form elements for the following tasks:
- Viewing Contacts - Controls the tabs displayed when viewing a contact record. EXAMPLE: If your organization does not keep track of Relationships, deselect this option to simplify the screen display. Tabs for Contributions, Pledges, Memberships, Events, Grants and Cases are also hidden if the corresponding component is not enabled.
- Viewing Smart Groups - Controls the display of the smart groups a contact belongs to.
- Editing Contacts - Controls the sections included when adding or editing a contact record. EXAMPLE: If your organization does not record Gender and Birth Date for individuals, then simplify the form by deselecting Demographics.
- Contact Search - Controls the sections included in the Advanced Search form. EXAMPLE: If you don't track Relationships, you will not search for that section. Simplify the form by deselecting this option.
- Contact Dashboard - Allows your constituents to view the groups they are subscribed to, their contribution history, event registration information and more. You can control the sections that should be included in the dashboard here. EXAMPLE: If you don't want constituents to view their own contribution history, deselect that option.
- WYSIWYG Editor - The editor provided to users to enter text in fields that allow HTML formatting (such as the introductory section for your online contribution pages). You can choose either CKEditor or TinyMCE. It's a good idea to try out both and see which is more comfortable for you and your users.
- Enable Popup Forms - this is on by default. Uncheck to revert to opening the form by refreshing the page.
- Individual Display Name - Display name format for individual contact display names.
- Individual Sort Name - Sort Name format for individual contact sort names.
Address Settings
At Localization > Address Settings CiviCRM allows you to modify the default fields for adding and editing contact and event address data. You can also change the address field layout used for screen display and mailing labels. Review the out-of-the-box defaults by adding a new contact record and noting the address fields provided on the form. Save the record and note the order in which the fields are displayed on the Contact Summary screen. If you plan on generating mailing labels for contacts, review the label layout (select Mailing Labels from the -actions- drop-down after doing a search using the Find Contacts menu option).
After reviewing the default fields and layouts, review the Address Settings screen and make changes as needed.
Mailing Labels - Controls formatting of mailing labels here. The default format is:
{contact.addressee}
{contact.street_address}
{contact.supplemental_address_1}
{contact.supplemental_address_2}
{contact.city}{, }{contact.state_province}{ }{contact.postal_code}
{contact.country}
You must include the {contact.addressee} token here in order to include the name of the addressee in your labels. Users will be able to select from a variety of label types corresponding to the label manufacturer code when they generate the labels from a list of contacts. It's a good idea to test your format with the type of label and printer you plan on using to verify spacing.
Address Display - Controls the layout of contact and event location addresses displayed on CiviCRM screens. The default format is:
{contact.address_name}
{contact.street_address}
{contact.supplemental_address_1}
{contact.supplemental_address_2}
{contact.city}{, }{contact.state_province}{ }{contact.postal_code}
{contact.country}
This format also applies to event locations, despite the use of the contact record type in the layout. The {contact.address_name} token is particularly useful for events where you need to include a location name (e.g. "Smithson Hall").
Address Editing Fields - Modify the available address editing fields here. You can hide fields that you don't plan on using in order to simplify the forms. EXAMPLE: If you don't plan on recording latitude and longitude for contacts, you can deselect those field.
Street Address Parsing- CiviCRM uses the US Postal Service's (USPS) Postal Addressing Standards to parse an address into fields to hold the address elements: Street Number, Street Name, and Apt/Unit/Suite. It's best to enter address information that conforms to the Postal Addressing Standards, not only for consistency in your data, but also to best take advantage of the the Street Address Parsing function. When address parsing is turned on you can edit and or view the parsed address by clicking on Edit Address Elements when you are editing a address.

You can learn more about USPS' Postal Addressing Standards at http://pe.usps.com/text/pub28/welcome.htm.
- Address Standardization - CiviCRM includes an optional feature for interfacing to the United States Postal Services (USPS) Address Standardization web service. You must register to use the USPS service at https://www.usps.com/business/web-tools-apis/welcome.htm. If you are approved, they will provide you with a User ID and the URL for the service. The URL provided by USPS will not be prefixed with "http://". When entering this URL into the CiviCRM settings field, you must prefix it with "http://".
Mapping and Geocoding
CiviCRM includes support for both the Google and OpenStreetMap mapping services. These services allow your users to display contact addresses and event locations on a map. To enable this feature, select your mapping provider and obtain a key for your site from that provider.
You can also select a Geocoding Provider. This can be that same or different form you mapping provider. Once this service is enabled, your contact and event records will be automatically geocoded (the latitude and longitude for that address is inserted) as you add or edit address data.
Search Settings
These let you adjust search behaviors such as the use of wildcards and which data to include in quick search results. Adjusting search settings can improve performance for large datasets.
A wildcard character is a special character that can be used to substitute for any other character or characters in searches. CiviCRM allows you to use the percent (%) character to substitute for zero or more characters, and the underscore (_) character to substitute for any single character. Wildcards are useful for broadening your search results.
For example, typing 'Volunteer%' as your Activity Subject will match any record whose subject starts with "Volunteer" (e.g. "Volunteer for Open House" or "Volunteering Opportunities").
- Automatic Wildcards - By default, when users search for contacts by Name, the Search interface treats the text as if it was surrounded by percent signes. EXAMPLE: Searching for 'ada' will return any contact whose name includes those letters - 'Adams, Janet', 'Nadal, Jorge', etc. Disabling this feature will speed up searches significantly for large databases, but will make users explicitly use wildcard characters ("%" or "_") for partial name searches.
- Include Email - By default, when users search contacts by Name, the Search interface also searches for the text in email addresses. Disabling this feature will speed up searches significantly for large databases, but users will need to use the Email search fields (from Advanced Search, Search Builder, or Profiles) to find contacts by email address.
- Include Nickname - By default, nicknames are automatically not included when users search by Name. Change this value to Yes if you want nicknames to be included.
- Include Alphabetical Pager - If disabled, the alphabetical pager will not be displayed on the search screens. This will improve response time for search results on large datasets.
- Include Order By Clause- If disabled, search results will not be ordered. This will improve response time for search results on large datasets significantly.
- Default Contact Search Profile - You can select a Profile to override the columns displayed by default in Find Contacts search results.
- Smart group cache timeout - Smart groups are basically saved searches. The list of contacts for each smart group is cached in the database in order to avoid running the saved search every time you access a smart group. This field determines the number of minutes to maintain the cache before refreshing it. The default value of 0 means the cache is emptied immediately when any contact is edited or a new one is added. If your contact data changes frequently, you may want to try setting this to a value of 5 minutes (or even longer) to reduce processing load on your server. The drawback of delaying the refreshing of the cache is that old data will still be served up to users for a few minutes after new data is added.
- Autocomplete Contact Search - If enabled, selected fields will be displayed in auto-complete dropdown lists and the "Quick Search" box on the navigation menu. The contact name is always included.
- Contact Reference Options - Selected fields will be displayed in autocomplete dropdown search results for 'Contact Reference' custom fields. Contact Name is always included. NOTE: You must assign 'access contact reference fields' permission to the anonymous role if you want to use custom contact reference fields in profiles on public pages. For most situations, you should use the 'Limit List to Group' setting when configuring a contact reference field which will be used in public forms to prevent exposing your entire contact list.
- Autocomplete Results- This specifies the maximum number of contacts to show at a time when typing in an autocomplete field. The default is 10.
- InnoDB Full Text Search -If you are using MySQL 5.6+ you can enable InnoDB full-text search optimizations.
Miscellaneous (Undelete, PDFs, Limts, Logging, reCAPTCHA, etc.)
Use the Miscellaneous Settings screen to configure and control the following behaviors:
Dashboard Cache Timeout -The number of minutes to cache dashlet content on the dashboard.
Checksum Lifespan -The number of days before a personalized (hashed) link will expire.
Contact Trash and Undelete - If enabled, deleted contacts will be moved to the trash (instead of being destroyed). Users with the proper permission are able to search for the deleted contacts and restore them (or delete them permanently).
- Logging - If enabled, all actions performed on non-cache tables will be logged (in the respective log_* tables). By default, these tables will be created in the same database. However you can configure CiviCRM to write logging tables to a different database by editing your site's civicrm.settings.php file. Specify the separate logging database in the CIVICRM_LOGGING_DSN setting. After enabling this feature you can review changes to contact records using the Contact Logging Report. Go to Reports > Reports Listing > Contact Logging Report (Summary).
- Attach PDF copy to receipts - If enabled, CiviCRM sends PDF receipt as an attachment during event signup or online contribution.
- Path to wkhtmltopdf executable -wkhtmltopdf is an alternative utility for generating PDF's which may provide better performance especially if you are generating a large number of PDF letters or receipts. Your system administrator will need to download and install this utility, and enter the executable path here.
- New Version Alerts - If enabled on-screen alerts will be displayed to users with "Administer CiviCRM" permissions when a new version of CiviCRM is available. This setting will only work if the "Version Check & Statistics Reporting" setting is enabled.
- Version Checking and Statistics Reporting -This feature automatically checks the availability of a newer stable version of CiviCRM. New version alerts are displayed on the main CiviCRM Administration page. Statistics about your CiviCRM installation are also reported anonymously to the CiviCRM team to assist in prioritizing ongoing development efforts. The following information is gathered: CiviCRM version, versions of PHP, MySQL and framework (Drupal/Joomla!/Wordpress), and default language. Record counts (but no actual data) are also reported. You can set this field to No if you are not comfortable with having this information reported for your site.
- Display "empowered by CiviCRM - When enabled, "empowered by CiviCRM" is displayed at the bottom of public forms. This will help increase awareness of CiviCRM.
- Maximum Attachments - You can increase or decrease the maximum number of files (documents, images, etc.) that can be attached to emails, activities, and grant records. The default value is 3.
- Maximum File Size (in MB) - Maximum size of a file (documents, images, etc.) which can attached to emails or activities. Note that your PHP configuration files, php.ini, should support at least as big a file size as the value specified here.
- Allow second-degree relationship permissions -If enabled, contacts with the permission to edit a related contact will inherit that contact's permission to edit other related contacts. This can be used, for example, to let the teacher of a class edited the records for students in that class when they are both linked to the class (set up as an organisation sub-type) via relationships.
reCAPTCHA - reCAPTCHA is a free service that helps prevent automated abuse of your site by requiring users to read a random pair of words and type them into the form. To use reCAPTCHA on public-facing CiviCRM forms, sign up at recaptcha.net, enter the provided public and private reCAPTCHA keys here, then enable reCAPTCHA under the Advanced Settings section in a Profile where you want it used.
If you want to use reCAPTCHA protection for online contribution, membership signup or event registration forms, you'll need to configure a Profile with reCAPTCHA enabled, and then include it in those forms.
Contact Types
You can modify the names of the built in Contact Types (Individual, Household, Organizations), and you can create and modify "contact subtypes" for more specific uses (e.g. Student, Parent, Team, etc..)
Outbound email
If you are sending emails to contacts using CiviCRM, you need to enter settings which allow CiviCRM to connect to your mail server. Such emails include sending receipts to contributors, sending confirmations to people registering for events, and using CiviMail to send bulk mailings.
CiviCRM supports three different methods of connecting to a mail server: mail (the built-in PHP mail function); SMTP (Simple Mail Transport Protocol); and Sendmail. Each method requires that you enter specific settings. If you're unfamiliar with these terms, or unsure of the correct values for these settings, check with your system administrator, ISP or hosting provider.
You should always send a test email after you enter or modify the settings. Simply click "Save and Send Test Email"(shown in the following screenshot). An email will be sent to the email address associated with your user login account. The From email address will be the default From address you've configured in the previous section.

If CiviCRM is unable to send the test email, you will see a message on your screen with the specific error and some suggestions for trouble-shooting the problem.
Disabling outbound email
If you do not want users to send outbound emails from CiviCRM at all, select "Disable Outbound Email". However, if you disable outbound email, and you are using Online Contribution pages or online Event Registration, you will need to turn off the automated receipting and registration confirmation features (these are enabled by default). Otherwise your constituents will see error messages after they've completed a contribution or registration.
Redirect to Database- If this option is selected, all emails will be recorded as archived mailings instead of being sent out.
See Email System Configuration for more details.
From Email Addresses
CiviCRM will use the default From address defined here when sending automated emails. If you've already entered an email address in the Domain Information screen, that address will be listed here (as illustrated on the leftmost field of the following screenshot).

When users send an email using CiviCRM, their primary email address is used as the From address by default. However, they can also select one of the general email addresses defined here as an alternative.
Payment Processors
Payment processors are companies that handle credit card transactions for merchants and non-profit organizations and then transfer funds to the organization's bank account. If you plan on using CiviCRM to accept online contributions, online membership signup and renewal or online event registration, you will need to select and configure a payment processor for your site.
CiviCRM includes support for several different processors, and provides a way for third-party developers to add support for additional processors based on their clients' needs. Each processor has their own pricing structure and features, and you will want to investigate each available option to determine the best fit for your organization. Refer to the "Contributions" section for a list of factors to consider in selecting a processor.
The actual steps involved in configuring and testing your payment processor connection are different for each processor. For more information, visit: http://wiki.civicrm.org/confluence/display/CRMDOC/Payment+Processors
Permissions for anonymous users
This link is only present on Drupal sites. On Joomla! and WordPress (and Drupal) Sites permissions for anonymous and other users are set after navigating to Administer > Users and Permissions > Permissions > Drupal (or Joomla! or WordPress) Access Control. See the Permissions and Access Control chapter in this section for information on setting permissions.
System Workflow Templates
CiviCRM comes with a set of system-generated emails, including contribution receipts and event registration confirmations. These are known as system workflow templates, and it's a good idea to review them. They will be sent out with your organization's name on them. You can customize the style and wording of these messages here.
Workflow messages include text AND necessary program logic. Use caution when editing so as not to modify the program logic. Be sure to test the workflow and review the emails sent after making any changes. If you find that your changes have caused problems, errors or missing information - you can always "Revert" to the system default for that workflow.
You should now have reviewed all the basic configuration tasks. The remaining tasks on the checklist involve an understanding of the ways in which you can record and use contact data and are best left until you have read more in this book.